In order to host all the stuff we want easily, we want to have easily controllable environments, to avoid too much configuration juggling. We would also like a reverse proxy to lead specific URLs to specific containers, as well as some way to easily administer the running applications.
Read more: Hosting stuff easilyDocker
First, we want to install docker, as this will provide us with numerous smaller environments, which will server our purpose. For some applications, this will ease the migration from existing on-prem installations, since we can basically script the setup of the server. For others, it will make it harder, if it requires a lot of manual interaction – but we will cross that bridge when we get to it.
Docker qualifies as open source software. Docker Inc., the developers are american, but the code has been released as the Moby project, under an Apache 2.0 license. The docker CLI is also open source found here.
First things first is to install the docker agent. This requires us to add the docker repository to the system, so we can find the installations, that are not supplied over the “standard” linux package repositories.
First we need to fetch the GPG public key for docker, to ensure that we receive the correct installation files going forward when updating. This is done either manually by going to https://download.docker.com/linux/ubuntu/gpg, and fetching it and running it through the gpg command, or with a script like this
curl -fsSL https://download.docker.com/linux/ubuntu/gpg | sudo gpg --dearmor -o /usr/share/keyrings/docker-archive-keyring.gpg(always be wary running scripts like this, that download and execute stuff from online. In theory this could also be an attack vector, if someone has hijacked the docker.com domain on your network – but this serves to ensure that this switch does not happen later)
Now we add the docker endpoint for our Ubuntu installation to our system
echo "deb [arch=$(dpkg --print-architecture) signed-by=/usr/share/keyrings/docker-archive-keyring.gpg] https://download.docker.com/linux/ubuntu $(lsb_release -cs) stable" | sudo tee /etc/apt/sources.list.d/docker.list > /dev/nullThen we update our list of packages
sudo apt updateAnd then we install the docker packages
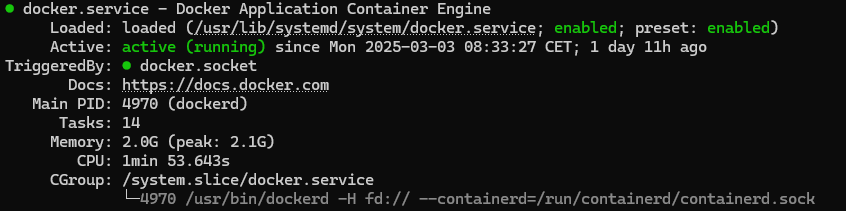
sudo apt-get install docker-ce docker-ce-cli containerd.io docker-buildx-plugin docker-compose-pluginWe now have a system that supports docker! We can check the resolution using the sudo systemctl status docker command, which should output
Traefik
In order to easily manage multiple applications on the same server, and to avoid having to map a lot of ports to avoid overlap, we want a reverse proxy. I have chosen docker for this, since I really like that it is pretty much a “fire and forget” server to set up, that can be managed on the individual docker services (through labels), and can “automagically” get new certificates from Let’s Encrypt!
It is pretty easy to set up, but we have some small modifications we want to do. We will set this up with docker compose, since this allows us to easily manage multiple docker servers.
Getting started with docker compose
It is pretty easy to get started, we just create a file called docker-compose.yml, somewhere on our server (please place it somewhere that is not among other things, like a directory just for this.). The contents of this will be filled out later, but if you want to try, you can always do a hello world using the following docker compose:
services:
  hello_world:
    image: hello-world
And then running it, by writing
docker compose upHow does Traefik work
Traefik works by connecting as a bridge between the host network (the server), and our docker networks. We will create a specific network for traefik to connect through, and other containers can just connect to the same network, label themselves as available for traffic, and traefik will direct them according to their labels. Easy, right? At least once it is configured. We have some small amount of changes that we want to do to the standard configuration though.
Most things in traefik can be configured either through the commands the container is run with, or with configuration YAML files. For this reason, we create a subdirectory for the configurations called simply, traefik
mkdir traefikRedirecting to HTTPS
One of the things we want to be able to do, is redirect our pages to the HTTPS version, always. This is supported by plugin in traefik, so we just have to configure the plugin, which we will do in a file. The name is irrellevant (as we will just load all the YAML files in the traefik folder), but I have named it redirect-to-https.yaml.
# Redirect to https
http:
  middlewares:
    redirect-to-https:
      redirectscheme:
        scheme: https
        permanent: true
Guarding some private services
Some services (like the web UI for traefik) are not something we just want anyone to access to. For now, we can just set up a basicAuth user, by creating a file called usersfile (name is not important), and putting in our username and hashed password like this
username:hashed-passwordHash your password using yopur own method, but for this plugin it should be MD5, SHA1, or BCrypt.
After we have create that file, we configure our new basic authentication middleware (which we have aptly named basic-auth) to simply use this file.
http:
  middlewares:
    basic-auth:
      basicAuth:
        usersFile: "/traefik/usersfile"
Guarding another way – IP AllowLists
In case we want something that is not at all accessible from something that is not our computers, we can find our own IP address, and add it to an IP allowlist like this
# Accepts request from defined IP
http:
  middlewares:
    ipwhitelist:
      ipWhiteList:
        sourceRange:
          - "1.2.3.4" #cbrams Home
          - "4.3.2.1" #cbrams work
Putting it all together
In our docker-compose.yml file, we will need to configure the traefik service, which will start like this
services:
  reverse-proxy:
    container_name: traefik
    # The official v3 Traefik docker image
    image: traefik:v3.3
    # Enables the web UI and tells Traefik to listen to docker
    command:
      - "--api.insecure=true"
      - "--providers.docker"
      - "--providers.file=true"
      - "--providers.file.directory=/traefik"
      - "--entrypoints.web.address=:80"
      - "--entrypoints.websecure.address=:443"
      - "--certificatesresolvers.httpchallenge.acme.httpchallenge=true"
      - "--certificatesresolvers.httpchallenge.acme.httpchallenge.entrypoint=web"
      - "--certificatesresolvers.httpchallenge.acme.email=your@email.com"
      - "--certificatesresolvers.httpchallenge.acme.storage=/letsencrypt/acme.json"
    volumes:
      # So that Traefik can listen to the Docker events
      - /var/run/docker.sock:/var/run/docker.sock
      # Store certificates
      - "/opt/server/data/letsencrypt:/letsencrypt"
      - "./traefik:/traefik"
    network_mode: "host"
The api.insecure command enables the web-UI, which is nice to confirm that everything is working.
We have two providers for settings, one is docker (since we would like to configure from the labels on the containers), and one are files, where we configure stuff in YAML files (which we just created!) We also set the directory (inside the container!), so Traefik knows where to look for it.
Next we define two entrypoints, one is “web”, which is plain HTTP on port 80 (mostly used to redirect directly to https), the other we call “websecure”, and is on the HTTPS 443 port.
Lastly, we instruct Traefik to do automatic certificate resolving. We configure a simple challenge on the HTTP port, send them our email (which letsencrypt once used to send you reminders if you forgot to renew, but I don’t think they do that anymore), and define were we store the certificates (again, where we store them INSIDE the container)
The first volume is a direct socket connection to the docker service, which traefik uses to listen to docker, so it knows when to start new services etc.
The latter two volumes are the storage for the certificates and the configuration files. Notice that the paths described earlier are both mapped, so we can edit the files outside the containers easily, while the container can consume them.
Lastly, we set network_mode to host, since we want Traefik to handle all the incoming data, so the firewall in the linux system will be the firewall for traefik.
Configuring with labels
Now we have a service running, and we can configure the access to our services. We can use the Traefik web-UI for a good test of this. In order to connect to it, we want to have the following already:
- The internal port used in the container for the connection – Port 8080 for Traefik dashboard
- A hostname (URL) that the service should respond to – traefik.cbrams.dk for me
For the first label, we will always want to define which network traefik will run on in docker (this is not required for other services, just Traefik)
    labels:
      - "traefik.docker.network=traefik"
This also necessitates defining the network, which is done at the bottom of the docker-compose
networks:
  traefik:
    name: traefik
Then we need to add the internal port that traefik will need to redirect the traffic to (back in the labels section). For Traefik web UI, this will be 8080
- "traefik.http.services.dashboard.loadbalancer.server.port=8080"Here we have decided that our system name (in regards to Traefik) to be “dashboard“. This is not super important, but this is how traefik names things, and it is good to start to think about this.
Next, we want any http traffic to be redirected to https. It has to be defined to accept anything, and as some browsers still try the http connection first, this is a good way to ensure that noone gets a failed connection, just because they forgot an s in https://.
      - "traefik.http.routers.dashboard.service=api@internal"
      - "traefik.http.routers.dashboard.entrypoints=web"
      - "traefik.http.routers.dashboard.rule=Host(`traefik.cbrams.dk`)"
      - "traefik.http.routers.dashboard.middlewares=redirect-to-https@file, ipwhitelist@file"
The first line defines the (traefik-)service name (this is not needed when defining via docker labels, and will be omitted going forward. The next references which entrypoint we reference (defined earlier, web is port 80, or just HTTP). The rule can match a lot of stuff, but here, we are just looking at what URL it requests and matches on that. Lastly, I use two middlewares – one will redirect to https, and the other will only make this endpoint available to our whitelisted IPs. Which means that if we accidently access this we will be sent to the https version, but if we are outside our list of recognized IPs, we will simply not be shown anything (not even a redirect).
In order to add our HTTPS endpoint, we remember that we called that endpoint websecure in our traefik definition, which gives us the folowing definition
      - "traefik.http.routers.dashboard-secure.rule=Host(`traefik.cbrams.dk`)"
      - "traefik.http.routers.dashboard-secure.entrypoints=websecure"
      - "traefik.http.routers.dashboard-secure.tls=true"
      - "traefik.http.routers.dashboard-secure.tls.certresolver=httpchallenge"
      - "traefik.http.routers.dashboard-secure.middlewares=ipwhitelist@file,basic-auth@file"
We see that this is the same url, just using the https port, and requiring TLS. We also define a resolver, where traefik has one defined for httpchallenge, which we defined the process for in the traefik configuration. You will also see instead of just using the ipwhitelist, we tacked a basic auth onto it, meaning even if we are from the correct IP, we still have to have access to the user. (This is not really needed, but serves as a good test that everything works).
After adding all this to our docker compose, it looks like this:
name: required-compose

services:
  reverse-proxy:
    container_name: traefik
    # The official v3 Traefik docker image
    image: traefik:v3.3
    # Enables the web UI and tells Traefik to listen to docker
    command:
      - "--api.insecure=true"
      - "--providers.docker"
      - "--providers.file=true"
      - "--providers.file.directory=/traefik"
      - "--entrypoints.web.address=:80"
      - "--entrypoints.websecure.address=:443"
      - "--certificatesresolvers.httpchallenge.acme.httpchallenge=true"
      - "--certificatesresolvers.httpchallenge.acme.httpchallenge.entrypoint=web"
      - "--certificatesresolvers.httpchallenge.acme.email=christian@brams.dk"
      - "--certificatesresolvers.httpchallenge.acme.storage=/letsencrypt/acme.json"
    volumes:
      # So that Traefik can listen to the Docker events
      - /var/run/docker.sock:/var/run/docker.sock
      # Store certificates
      - "/opt/server/data/letsencrypt:/letsencrypt"
      - "./traefik:/traefik"
    network_mode: "host"
    labels:
      - "traefik.docker.network=traefik"
      - "traefik.http.services.dashboard.loadbalancer.server.port=8080"
      # HTTP with IP Whitelist
      - "traefik.http.routers.dashboard.service=api@internal"
      - "traefik.http.routers.dashboard.entrypoints=web"
      - "traefik.http.routers.dashboard.rule=Host(`traefik.cbrams.dk`)"
      - "traefik.http.routers.dashboard.middlewares=redirect-to-https@file, ipwhitelist@file"
      # HTTPS with IP Whitelist
      - "traefik.http.routers.dashboard-secure.rule=Host(`traefik.cbrams.dk`)"
      - "traefik.http.routers.dashboard-secure.entrypoints=websecure"
      - "traefik.http.routers.dashboard-secure.tls=true"
      - "traefik.http.routers.dashboard-secure.tls.certresolver=httpchallenge"
      - "traefik.http.routers.dashboard-secure.middlewares=ipwhitelist@file,basic-auth@file"

networks:
  traefik:
    name: traefik
We can run this with
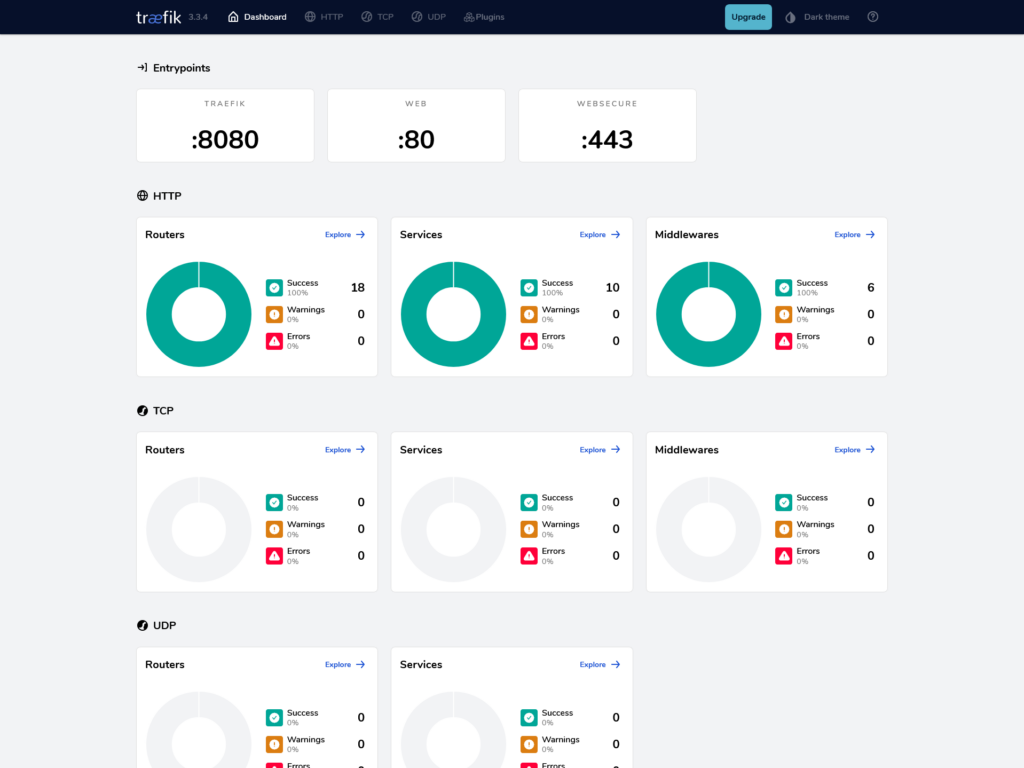
docker compose up -dand with this setup, we can finally see our dashboard in action on traefik.cbrams.dk
(I have a few more services set up, this blog among others)
Portainer – Maintaining the applications
Another really useful tool we want to get up and running quickly, is the portainer application, which hooks into docker directly, and gives us a “docker desktop like” interface for giving us an overview of our containers running on the host (or on other hosts, if we connect them).
Portainer has it’s own login screen, so we can easily just set this up quickly, with the optional IP whitelist by adding the following to our docker-compose.yml file under “services”.
portainer:
    container_name: portainer
    image: portainer/portainer-ce:latest
    volumes:
      - /opt/server/data/portainer:/data
      - /var/run/docker.sock:/var/run/docker.sock
    restart: unless-stopped
    labels:
      - "traefik.enable=true"
      - "traefik.docker.network=traefik"
      - "traefik.http.services.portainer.loadbalancer.server.port=9000"
      # HTTP with IP Whitelist
      - "traefik.http.routers.portainer.rule=Host(`portainer.cbrams.dk`)"
      - "traefik.http.routers.portainer.entrypoints=web"
      - "traefik.http.routers.portainer.middlewares=redirect-to-https@file, ipwhitelist@file"
      # HTTPS with IP Whitelist
      - "traefik.http.routers.portainer-secure.rule=Host(`portainer.cbrams.dk`)"
      - "traefik.http.routers.portainer-secure.entrypoints=websecure"
      - "traefik.http.routers.portainer-secure.tls=true"
      - "traefik.http.routers.portainer-secure.tls.certresolver=httpchallenge"
      - "traefik.http.routers.portainer-secure.middlewares=ipwhitelist@file"

    networks:
      - traefik
Note that I have largely the same tags as before, but only have I connected portainer to the traefik network, which means that traefik is responsible for connecting our traffic to the service. Also, I have allowed portainer to connect to the docker socket (just as traefik), since it requires this access to run docker commands (like closing containers, seeing their files and following their logs). The rest of the data, I have mounted simply on the the disk – an unnessecary element, but I wanted to avoid having to set up the portainer instance again in case I moved it around.
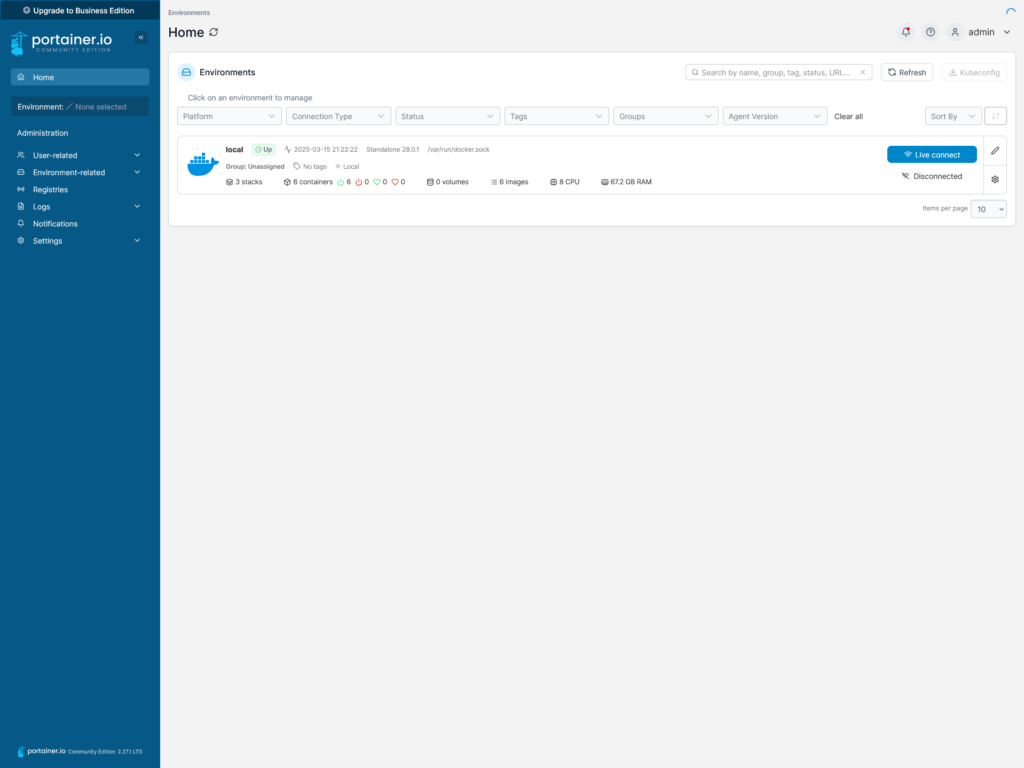
Running docker compose up -d again, gives us the portainer interface, which quickly allows us to set up (which is nice having hidden behind the IP whitelist), and giving us a quick overview for our server
That’s it! Next, we will set up wordpress, to be able to document everything.
Leave a Reply